Export to Firing Systems (FWsim Pro)

Export to Firing Systems (FWsim Pro)

FWsim Pro can export your show data to a variety of firing systems (see list of supported systems).

Preparing a show for data export

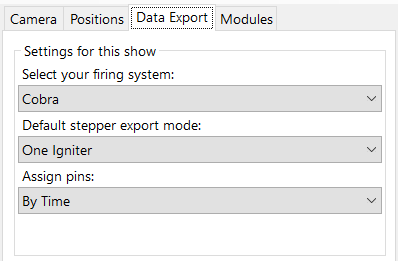
When creating a new show, FWsim Pro asks you which firing system to use. You can change that later in the sidebar.

With most firing systems, FWsim Pro can generate the channel assignment for you.

First, add enough modules in the “Modules” tab in the sidebar. Then drag each module to the appropriate firing position in the 3D window. The module number will be displayed next to the name of the firing position. For example:

In the “export” sidebar, you can also define whether to export a stepper as one firing impulse (with the other shots connected pyrotechnically), or if you want to export one firing impulse per shot:

This setting can also be changed for each stepper individually. In order to do that, click the stepper and go back to the “Export” tab in the sidebar.

Automatic channel assignment

To assign channels, click Export → “Auto-Address”. Channel assignments are not updated automatically when you export.

Channel assignment can be customized through a variety of options:

  1. By using Stepper cues, and the “One Channel” or “Multiple Channel” option (see below).
  2. By chaining cues (see below).
  3. You can also define some channels manually and “lock” them, so that they are not overwritten by FWsim. This allows you to set some channels manually and have others be auto-generated.
  4. In the sidebar under “Export”, FWsim can be configured to assign pins in a certain order. This is useful for better cable management in the field. For example, you may want to have cues sorted by time, by caliber, or alphabetically.
  5. FWsim can also combine cues into one channel if they are fired roughly at the same time. For some firing systems, this is done automatically based on the limitations of the system. To change that behaviour, open the Sidebar, find “Settings for this show”, scroll down, and click the button “Advanced Settings”.

Steppers and Channels

In the sidebar of the main window, under “Export”, you can define the default stepper export setting for this show:

How to run a stepper through multiple positions

When creating a stepper, FWsim can automatically put the individual stepper shots on the correct positions. This is important for automatic channel assignment and for exporting plans. In order to make that work, you’ll need to follow a few guidelines:

  1. Make sure that your positions are on one line, with equal distance between them.
  2. In the sidebar (on the right side of the show editor), under “Export”, activate the option “Put Stepper elements on nearby positions”
  3. Your stepper count must match the number of positions. For example, if you have 9 positions next to each other, then your stepper must have count 3, 5 or 9 (so that every element is exactly on one position).

When you follow these guidelines, FWsim will recognize that each individual stepper shot belongs to a specific position. If you have an unusual case in which these instructions do not work, please let us know.

Splitting Rails across Different Positions

When a single module is shared between multiple positions, you may want to control exactly which rails (or pin ranges) are used for each position. This prevents all cues from being assigned to the same rail regardless of their position.

  1. In the Export tab, add a module and set the number of channels and pins per rail.
  2. Drag the module to the first position to connect it. Then drag from the same module again to connect it to a second position.
  3. Click on a position connection (e.g. “Pos. A”). In the window that opens, set the pin from and pin to fields to restrict which rail and pins are used for that position. For example, set “1.1” to “1.16” to use rail 1 only.
  4. Repeat for the other position. For example, set “2.1” to “2.16” for rail 2 and add another line for “3.1” to “3.16” for rail 3.
  5. You can also restrict pin assignment by angle or by effect type if needed.
  6. Run Export > Auto-Assign Channels to apply the settings. The table view will confirm that each position uses only its designated rails.

Chains

You may want to connect some cues pyrotechnically - so that several cues receive only one channel on the firing system.

To do that, you can chain several cues together. By chaining cues, only one firing impulse will be generated in the exported data. The chains will be illustrated in the timeline with arrows.

You can chain cues together in several ways:

  1. Right-click the first cue in the timeline, and select “Chain Cues”. Then click the cue you want to chain it with. (The very first cue in the chain will receive a channel, the next cues will not)
  2. Alternatively, select an entire group of cues in the timeline. Then right-click and click “Chain Cues”.
  3. Instead of right-clicking, you can also use the keyboard shortcut: CTRL+D.

After creating the chain, select Export → “Auto-Address” and the channels will be updated.

Creating re-usable chains

In the section on chains, you learn how to create chains of cues - so that several cues only receive one channel.

You may want to create chains that are being re-used in several places. Our recommended way of doing that is creating a cake in the effect editor. You can load up that cake with any number of effects you want.

The only problem with that approach is that the cake shows up as type “Cake” in the effect selection window. There is a simple solution for that: Click File → “Change Type, Caliber or Custom Data” in the effect editor menu. (video demonstration )

Automatic Cue Combining

When working on large shows, manually chaining every pair of simultaneous cues can be time-consuming. FWsim offers a fully automatic alternative: the Combine Cues feature.

To enable it, go to the sidebar, find “Settings for this show”, scroll down, and click “Advanced Settings”. Here you can enable the “Combine Cues” option and set a timing window — for example, 5 milliseconds.

When you then run Auto-Address, FWsim will automatically combine any cues on the same position that fall within that timing window onto a single channel. This can save dozens or even hundreds of channels on a large-scale pyromusical, without requiring you to create chains by hand.

Use manual chaining when you need precise control over specific cues, and automatic combining when you want to optimize the entire show efficiently.

Manual Channel Assignment

To assign channels manually, click a cue and select the “Export” tab in the sidebar.

For a stepper, this tab will look like this:

For a single shot, you will get the following display:

You can enter the address in several different formats. For example, to enter “Module 2, Pin 5”, you can type “2/5” or “2.5”. As soon as you enter an address manually, a lock will apear. The lock means that this address can no longer be changed by the automatic channel assignment. This is useful when you want to use automatic channel assignment, but set some specific channels manually.

If you don’t want the lock, click it and the channel will be unlocked again. During the next automatic channel assignment, ths channel assignment will be overwritten without confirmation.

Sections (Semi-Automatic Firing)

Some firing systems support “sections”: After each sequence is fired, the system pauses and waits for a button press before continuing. This is also known as “Semiautomatic Firing”. FWsim can currently export sections to the following firing systems:

Cobra, Firelinx, FireOne, Firetek (old format), Firetek New Format (v4 or newer), Firetek USB Transfer (old modules only), Piroshow, Pyromac, Pyroneo, RFRemotech

If your firing system is not listed and you want to export sections, please contact us.

In order to create a sequence:

  1. Position the playback cursor wherever you want your sections to start
  2. Click Export → Start New Section
  3. Enter a name for the section or just press ENTER if you don’t need a name
  4. The section start will show up as a text comment in the timeline, ending with “>>”. For example, if you entered the section name “Cake Sequence”, then there will be a text comment “Cake Sequence >>”.
  5. You can change the section name at any time simply by editing the text comment. Make sure the “>>” at the end of the comment remain in place.

Assigning a Channel to Music

Many firing systems offer a dedicated music player. Usually, this player is its own module and starts the music when firing channel 1.

There are two ways of assigning a channel to music:

Automatic (always on module 50)

  1. Create a module with one channel. The module must have module nr 50.
  2. Click your Music in the timeline, and activate “Assign Channel”.
  3. When you then auto-assign channels, the music will always be put on Module 50, Channel 1.

Manual

  1. Create a module with one channel. It can have any module number.
  2. Click your Music in the timeline, select the “Data Export” tab on the right and activate “Assign Channel”.
  3. In the box below, enter your module and channel number.

SMPTE Timecode Export

Some pyrotechnic firing systems support synchronization with SMPTE timecode. The firing system listens to an incoming timecode signal and plays the show based on that time basis. The timecode is an audio signal containing the current show time in a digitally encoded format.

This provides an elegant way to synchronize your show with music: the SMPTE timecode goes on the left audio channel and is sent to the firing system, while the music goes on the right channel and is sent to the speakers.

FWsim can create this combined audio file for you. Click Export and select “Music and SMPTE”. The resulting file will have the digital time signal on the left channel and your music on the right channel.

If you are using a Cobra firing system, set the Timecode option to “timecode1” or “timecode2” when exporting your Cobra script. With timecode1, the system continues firing if the timecode signal is lost. With timecode2, a loss of signal stops the show.

Firing system export

Click Export → “Export to Firing System” to export your show to the previously defined system. We have more specific instructions available for some systems - please check our (list of supported systems).

My firing system is not supported by FWsim

If your system is not supported yet, there are two things you can do:

  1. send us a message and let us know what system you would like to use. We are always interested in supporting more systems.

  2. You could use the CSV export, and try to make it work for your firing system. You could also export via CSV and then shuffle the data around with Microsoft Excel or other software. If you need help, please let us know.