When you start FWsim, the show editor appears. In this window, you can plan shows and access the other program parts (e.g. the firework effect editor).
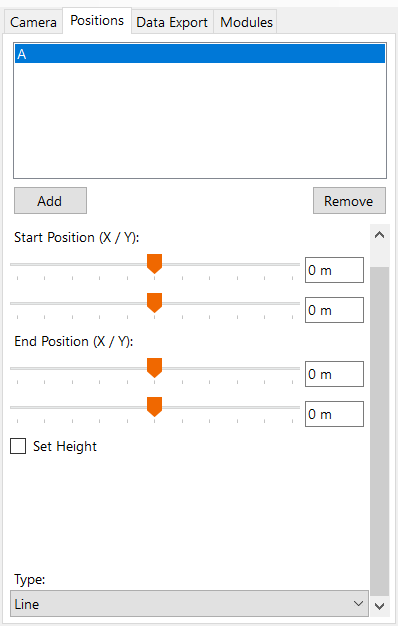
The 3D view shows the firing place, your firework, and the firing positions. In the timeline, you can change the ordering and timing of fireworks. From the toolbox, you can add new firing cues aswell as music and camera moves. The sidebar shows the settings for the currently selected cue. It also gives you access to the firing positions, camera settings, and functions for data export. Via the menu bar on top, many other features can be reached.
FWsim Pro by default starts in windowed mode. FWsim Basic & Creative Edition start in Fullscreen mode. You can switch between Fullscreen and windowed mode by using the “View” menu in the Show Editor. If you’re in fullscreen mode and want to switch to other applications, use the ALT+TAB Windows shortcut.
In the timeline, time runs from left to right. The vertical tracks have no particular meaning: You can move your cues freely up and down these tracks, to organize your show better.
If you need more vertical tracks, just click a cues with the left mouse button, hold it, and drag downwards. New tracks will appear.
Select a single shot or stepper in the timeline. In the 3D view, a mortar appears, which shows you the location. In the case of a stepper, multiple mortars appear with arrows designating the start and end of the stepper.
To move a mortar or arrows, click them and leave the mouse button pressed. Then you can move them with your mouse. To rotate them left or right, hold the right mouse button and move your cursor sideways.
Select a cue in the timeline. Then, you can edit its properties in the sidebar. More functions are available in the “Edit” menu on top, and via right-click on the cue.
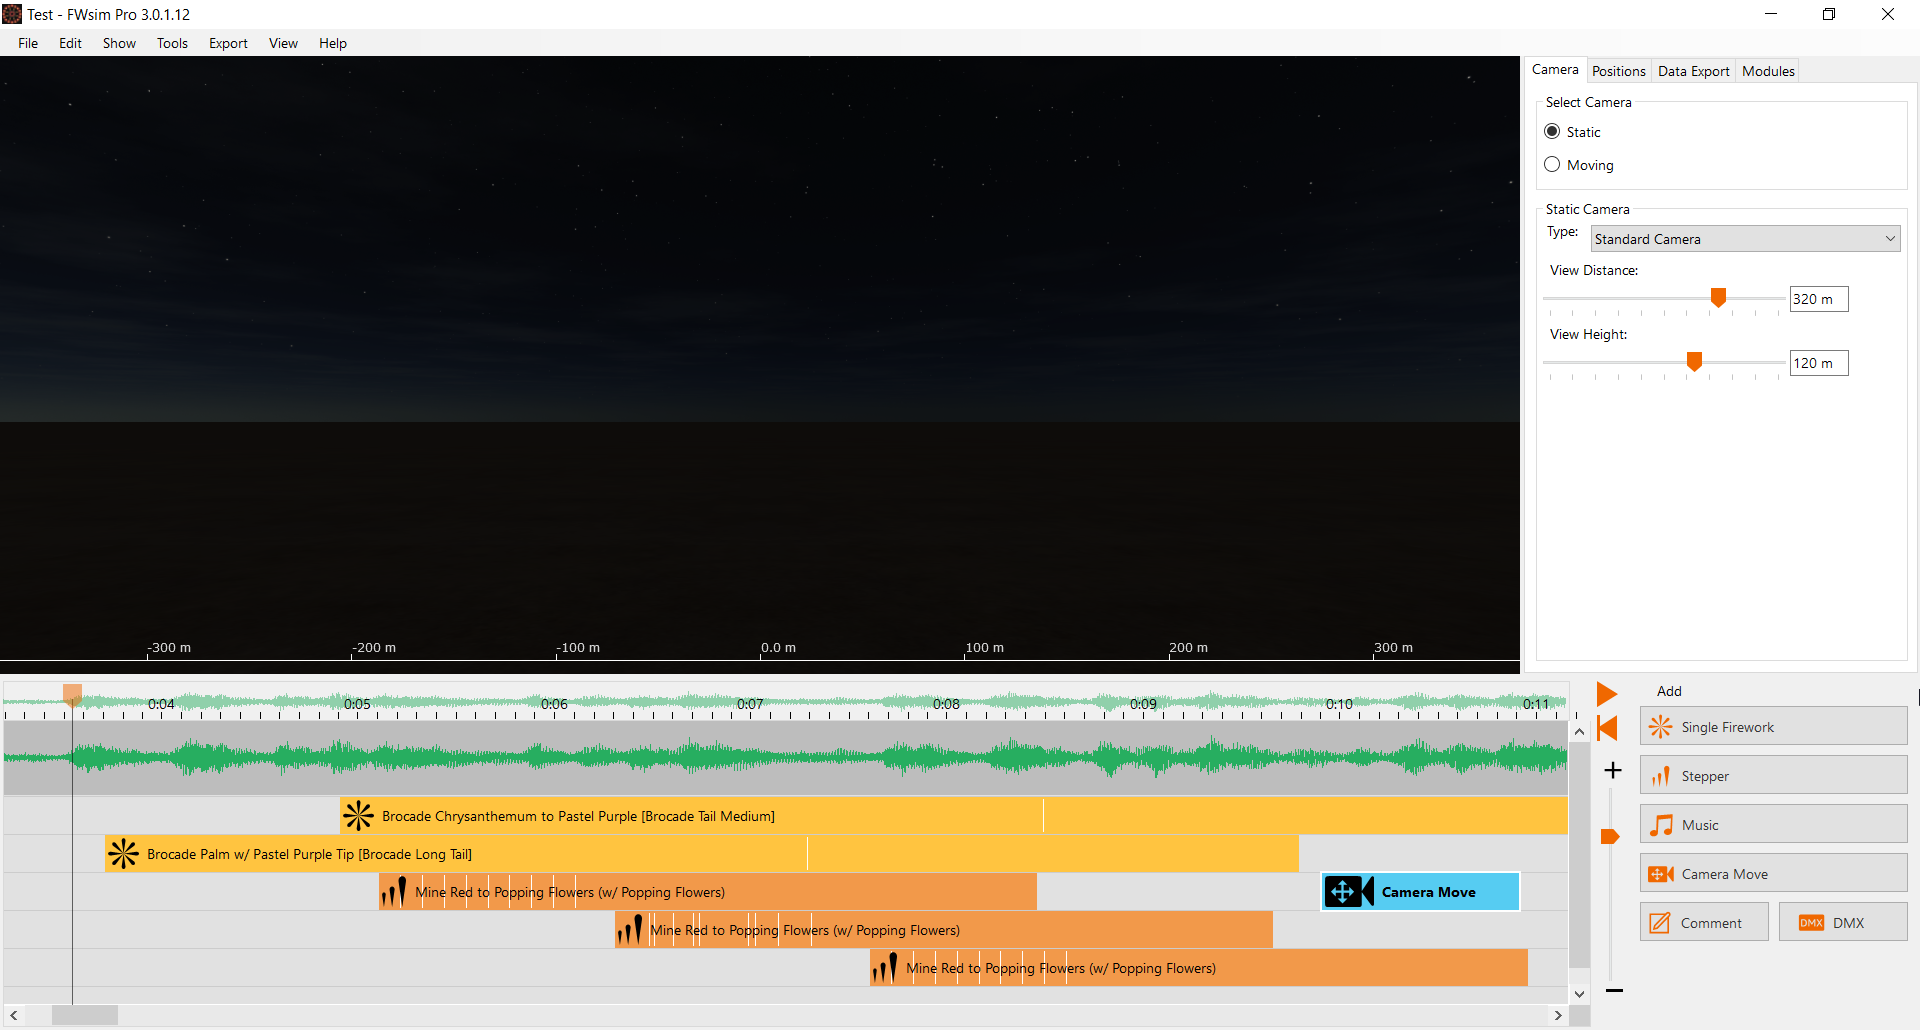
To change the effect, click on the top left button or press F2. The box to its right allows selection of firing position (see Positions). Under “Rotation”, you can change the mortar angle. Please note: in FWsim, you can rotate mortars left/right. In FWsim Pro, you can rotate along all axis (left/right, front/back, and rotating the shell inside the mortar).
With a stepper, you have the same options as with single shots. Furthermore, you can adjust:
To add music, click the “Music” button. You will then be asked for a filename. Select your file and click “OK”. Then, you can click into the timeline to add the music.
FWsim 3.0 supports most common audio formats: WAV, MP3, FLAC, OGG, AIFF. Unfortunately, the AAC format (used for Apple iTunes) is not supported. If you need to use AAC files, please use this converter to convert it to the FLAC format - without losing quality. Note that the music player software on your computer might not be able to open FLAC files - but FWsim can.
However, please note that you cannot use Music CDs with FWsim. This is because music CDs contain their data in a special file format. To convert CD music to audio files, you can use free software like Exact Audio Copy.
Note for users of FWsim Pro: When working with firing systems, please be aware that many firing systems require your music to start exactly at 0:00. To ensure that this is the case, grab the music cue with your mouse and move it towards the left as far as possible.
To get music from YouTube into FWsim, without losing quality, please use this YouTube to FLAC converter. Note that the music player software on your computer might not be able to open FLAC files - but FWsim can.
It is possible to add multiple pieces of music into the timeline. However, you cannot edit the music files.
If you want to add multiple pieces of music, and you have one continuous show that plays in one go, we recommend you edit the music using the free Audacity software. When you are finished editing, export your file as WAV for optimum quality.
In FWsim, shows are displayed in a virtual 3D world. Since each show will have different arrangements and sizes, it is important to adjust the camera.
In the sidebar, click the “Camera” tab:

Click static to define a camera position right in the sidebar.
Click moving if you want to use a moving camera in your show.
You need to select Edit Moving Camera first and add keyframes (more on that below).
You can always switch between both options without losing your settings
With the normal camera, you can adjust distance to the firing site and height.
The helicopter camera allows you 360° flight around the firing site.
The Free Camera can be moved freely using mouse and keyboard. Please refer to the instructions on the screen.
The View from Above is useful for precise positioning, and for getting a good impression of the site layout.
When using the Static Camera, use the “Save” icon in he sidebar to remember your camera position. The position is the stored in the show, and you can always go back to it later.
To quickly switch between these stored positions, use the shortcuts CTRL + 1, CTRL + 2 etc.
If you want the camera to move during the show, select Edit Moving Camera in the sidebar. This will open a new area on top of the timeline, in which you can configure camera moves.
To add a new animated camera position, move the playback cursor to the desired position and press “Add Camera Keyframe” in the toolbox. To make the camera actually move, you need at least two different positions at different times.
Click a camera keyframe to adjust its properties. You can press DELETE to remove a keyframe. You can select multiple keyframes by holding the SHIFT key, and you can copy / paste keyframes.
You might want to composit FWsim videos together with animation designed in other 3D software. For that, you need to match up the cameras between FWsim and other 3D applications.
FWsim allows you to design a camera move in other applications, then import that camera data. It is also possible to import a static camera, it doesn’t need to be animated.
The instructions below are written for the open-source Blender 3D animation software. If you need help getting camera moves from other software into FWsim, please let us know.
Hold SHIFT and then click several cues. You can now adjust all cues at once (e.g., change the effect, delete, copy, paste or move).
Alternatively, you can also drag a rectangle with the mouse in the timeline: Click on an empty area in the timeline, hold down the left mouse button, and then move your mouse.
Click File → “Export Video” to produce a high-quality video of your show.
You have the option to select the AVI or the MP4 file format. If you want to process FWsim files in other software (for example, in your video editor), then you should select the MP4 file format. Otherwise, it doesn’t matter.
The two file formats (AVI and MP4) will contain the exact same video data, so there is no difference in video quality. And there is no practical difference in audio quality: The AVI file contains WAV audio, which is 100% lossless. The MP4 file contains MP3 audio with a bitrate of 320kbit, which offers the same high quality for all practical purposes.

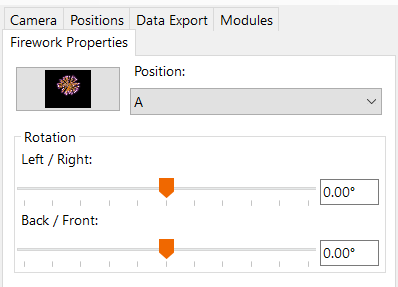
This menu provides the following functions:
In the “View” menu, you can change to two-monitor mode. On one monitor, you can place the timeline, and on the second one view the show.
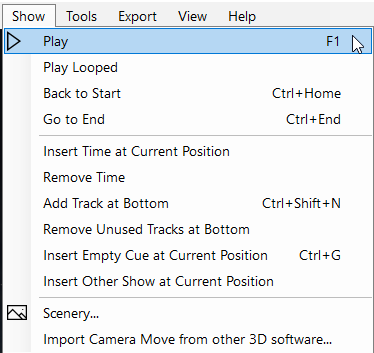
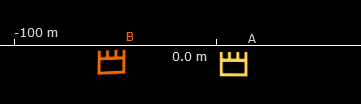
The term “positions” refers to lines or points on which fireworks are placed.
It is not necessary to use positions at all - you can also place your mortars anywhere in space. However, in practice it will be very helpful to use the “Positions” feature.
In the sidebar, select “Positions”. There, you can add, remove or modify positions.
At the same time, your positions (points or lines) will be shown in the 3D world:
You can now move these positions in the 3D view, or enter the exact positions in the sidebar.
If you move effects in the 3D world, they will automatically snap onto positions. If you do not want your effects to snap, hold the CTRL key while you move them.
In FWsim Pro, it is possible to change the height of positions. For that, activate the box “Set Height”, and adjust the height using the slider. When your position is a line, you can also setup a slope, so that start- and endpoint are on different heights.
When you place steppers on positions, please be aware:
If you span a stepper from one position to a different position, internally only the start- and endpoint will be on a position, the other shots will have no position assigned to them. Therefore, if you export a firing plan, no position information will show up for the shots in the middle. To circumvent this problem, we suggest to place steppers always on “Line” positions. For future versions of FWsim Pro, we plan to make it possible to place steppers through multiple positions.
If you place steppers on “line” positions, then FWsim remembers the position, the angle and the number of shots of the previously seleted stepper and uses it when placing the next stepper.
The position of a stepper is always stored relative to its position. For example, if you create a stepper that covers 50% of a line, and then put this stepper on a different line, then it will also cover 50% of the space there.
FWsim Pro provides a very basic visualization for Flamejets and lights. Lights have constant color and varying brightess based on DMX value. Flamejets allow opening and closing with arbitrary DMX values.
These capabilities are obviously quite limited, but might be useful for some shows where DMX devices play only a minor role.
Instead of DMX, you also have the option of controlling flamejets via standard electrical channels on your firing system. These channels are then triggered multiple times, once for each firing.
Please check whether these two scenarios (DMX data or channels on your firing system) are supported for your firing system on our list of firing systems supported in FWsim Pro.
In the toolbox on the right-hand side of the screen, click “DMX”. A list will popup, showing all the available devices. Click “Add” to add a new DMX device.
Each DMX device has the following attributes:
Each DMX cue has the following attributes:
Each cue corresponds to a DMX channel at a certain value. The channel will remain at this value as long as the cue persists, and the channel value will be set to 0 when the cue ends. You can change the length of the DMX cue by selecting the right edge with the mouse and dragging.
For lights, the DMX value determines the brightness. For flamejets, the DMX value does not affect the simulation in any way - simply set the channel to the value that your specific model of flamejet requires.
Right-click the cue in the timeline and select “Change DMX Device”. Here, you can select a different device for your cue or edit the attributes of the device. Please note that the device-specific attributes (type, DMX universe, DMX channel, light color) are stored per device, and several cues might refer to one device. This means, if you click “Change DMX Device” on one cue and change the light color, all other cues using the same light will also be affected.
Please note: DMX data can only be exported to the Piroshow, Pyromac and Firetek systems. At the moment, there is no way to export DMX data for other systems, or to CSV. Please contact us if you want to use DMX data with other systems.
Simply export data for your firing system, as you do normally. The DMX data will be included if your firing system is among the previously mentioned systems. For all other systems, your firework cues will be exported normally while the DMX data will be ignored.